December 13, 2019

Using PowerShell to build .Net projects

When working on .NET projects, in most IDEs build” and rebuild” buttons are used very often. Generally speaking the build” operation transforms code into binaries. In the workplace or when an individual invest in continues integration flow, build is performed automatically after each PR or commit on a dedicated server called build server”.
The build process is performed by msbuild.exe which has default instructions for building code. msbuild.exe can accept an XML file with a specific schema, called msbuild project file, that can extend and modify these instructions. In this post I will talk about the problems we faced with msbuild project file and Jenkins and present a better way (in my opinion) to extend the build process by using PowerShell.

I presented this topic at the Code Review group meetup on 2019.11.4 at Microsoft Reactor in Tel-Aviv.

What is MSBuild Project file

Reference: microsoft docs site

MSBuild project file is a type of instructions file to build .NET projects and solutions.
It usually invokes build or rebuild (compliation and linking), and allows to run commands or tasks before and after that like running unit tests, archiving, etc…

Similar to rake (ruby make), cake (make with c#), make for C/C++, and in a way also to Dockerfile (hehe… :)).

Usual steps:

- init
- clean
- restore packages
- build
- package

MSBuild invocation examples

.proj - msbuild project file

msbuild dummy.proj -t:rebuild

invoking msbuild on the entire solution (.sln - solution file)

msbuild dummy.sln -t:rebuild

invoking msbuild on specific project (.csproj - c# project file)

msbuild dummy.csproj -t:rebuild

Structure of MSBuild project file

<!--FileName: build.proj -->
<Project xmlns="http://schemas.microsoft.com/developer/msbuild/2003" DefaultTargets="Destination">

  <PropertyGroup>
    <ProjectName>My.Dummy.Service</ProjectName>
    <BuildPlatform>Any CPU</BuildPlatform>
    <Configuration>Release</Configuration>
    <Artifacts>$(MSBuildProjectDirectory)\Artifacts\</Artifacts>
    <ProjectPath>$(MSBuildProjectDirectory)\My.Dummy.Service</ProjectPath>
    <TestResultsPath>$(Artifacts)\TestResults.xml</TestResultsPath>
  </PropertyGroup>

  <Target Name="C">
    ...
    <Message Text="Target 'C' - ProjectName: $(ProjectName)" />
  </Target>

  <Target Name="B">
    <CallTarget Targets="C"/>
    ...
  </Target>

  <Target Name="A">
    ...
    <CallTarget Targets="B"/>
  </Target>

  <Target Name="Destination">
    <CallTarget Targets="A"/>
  </Target>

</Project>
  • Properties section - At the top - to be used throughout the build process.
    In the example above:
    • ProjectName
    • BuildPlatform
    • Configuration
    • Artifacts
    • ProjectPath
    • TestResultsPath
  • Targets section - At the bottom - Targets containing tasks or steps.
    In the example above:
    • Destination (the default task - specified at the top in the <project> tag)
    • A
    • B
    • C

Example Output:

Microsoft (R) Build Engine version 16.3.2+e481bbf88 for .NET Framework
Copyright (C) Microsoft Corporation. All rights reserved.

Build started 12/13/2019 6:47:19 PM.
Project "C:\Users\Granola\Example.proj" on node 1 (default targets).
Destination:
  Before calling Target 'A'
A:
  Before calling Target 'B'
B:
  Before calling Target 'C'
C:
  Property 'ProjectName' = 'My.Dummy.Service'
  Perform anything else...
B:
  After calling Target 'C'
  Property 'BuildPlatform' = 'Any CPU'
A:
  After calling Target 'B'
Destination:
  After calling Target 'A'
  Perform anything else...
Done Building Project "C:\Users\Granola\Example.proj" (default targets).  

Build succeeded.
    0 Warning(s)
    0 Error(s)

The problems we faced

  1. MSBuild Project file is hard to maintain.

    Developers resort to copy-pasting the same build file from other projects without understanfing it, and hoping that it will still work in the new project. When it doesn’t they call to operations: … help! my build failed!…”

    How its maintained today:
    1. Copy-Paste
    2. Google and Stack Overflow
    3. Documentation in the microsoft docs site, and although the schema can be extended it’s rarely done.
    4. Example of hacked” build file: MSBuild Project file. Which connects us to the next pain point.
      This is the hacked” part:
    <Exec Command='"%programfiles(x86)%\Microsoft Visual Studio\2019\Enterprise\Common7\IDE\devenv.com" "@(SolutionFile)" /Build "Release|x64"' />

    (Literally invoking msbuild of VS 2019 enterprise edition by its full path from inside the build project file - which was invoked by earlier version of msbuild installed on the build server)

  2. Invoking specific MSBuild version in Jenkins required that we specify a name and a path to each executable. While the latest Visual Studio enterprise edition will suffice, that is not always the case. It requires the developers to know which msbuild version their project require and pass it as parameter.
    • Our build flow is strict but the developers have freedom to run some procedures during, via the build file.
    • As long as they provide at the end artifacts we can use for deployments.

    This is how we call msbuild from Jenkins:

    pipeline {  
        parameters {
            string (name: BUILD_FILE)
            string (name: MSBUILD_VERSION)
        }
        stages {
            stage ('pull code'){
                // git
                // mercurial
                ...
            }
            stage ('build'){
                steps{
                    script{
                        ...
                        // if cake
                        // if psake
                        // if msbuild (jenkins general tools)
                        else if(params.BUILD_FILE =~ /(?i).+\.proj$/){
                            if(params.MSBUILD_VERSION == 'v14'){
                                ...
                            }
                            else if(params.MSBUILD_VERSION == 'v15'){
                                ...
                            }
                            else if(params.MSBUILD_VERSION == 'v15ent'){
                                ...
                            }
                            else if(params.MSBUILD_VERSION == 'v16')
                                bat label: 'invoke msbuild v16 (2019 professional)', returnStdout: true, script: "\"${tool 'MSBuild-V16'}\" ${params.BUILD_FILE}"
                            }else{ // latest
                                ...
                            }
                        }else{
                            ...
                        }
                    } // script
                } // steps
            } // stage ('build')
            stage ('publish artifacts'){
                // nexus
                // artifactory
                ...
            }
        }
    }

    To use the keyword tool and call different MSBuild executables in Jenkins pipeline they need to be specified in the global tool configuration window:
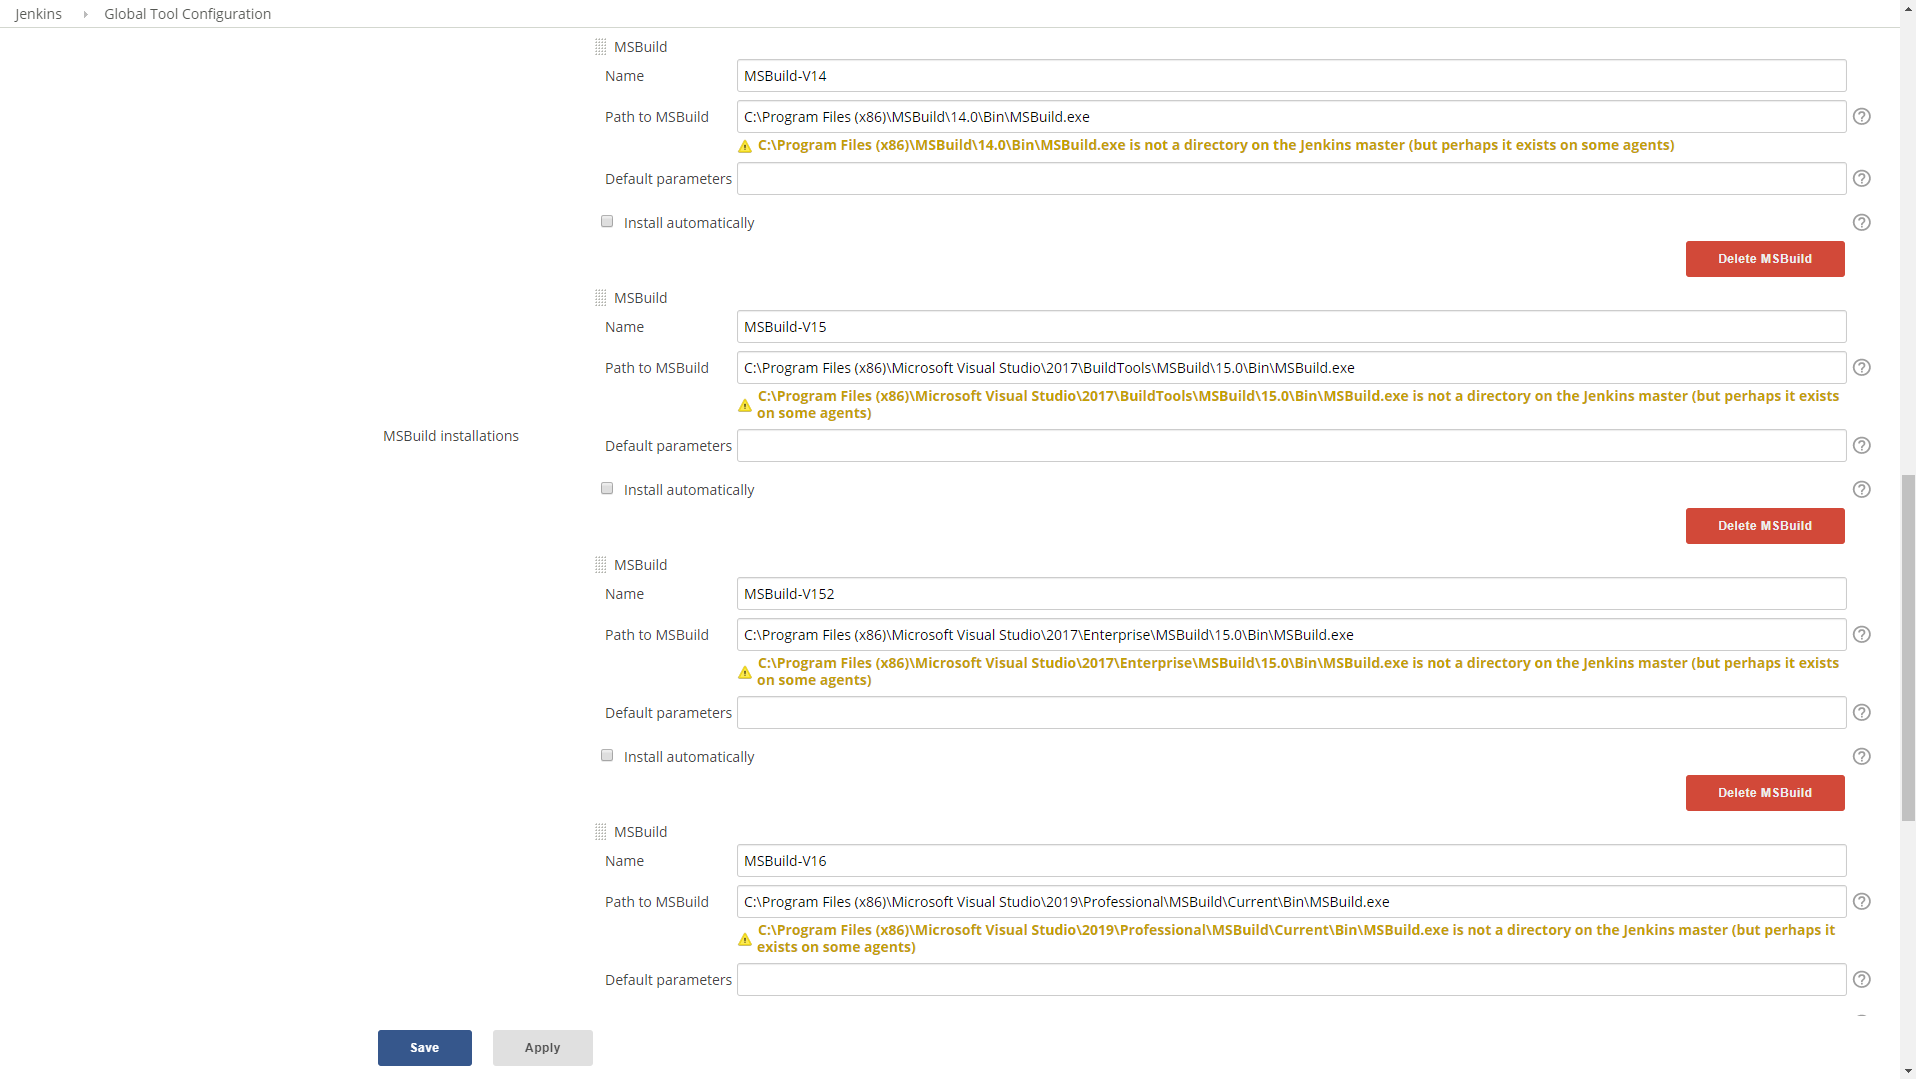
    Jenkins Global Tool Configuration - MSBuild locations


The shift to scripted build files

The shift to scripting happened thanks to dotnet core and dotnet cli.
When we started moving to dotnet core we encountered some problems compiling it with msbuild project files, We liked the ease of use of dotnet cli, and also Microsoft suggested this as a valid option.
So it was an excuse to try building projects with scripts.

Developers may need to learn new scripting language which is useful and probably easier as its closer a programming language they know (e.g. C# or F#), unlike MSBuild XML which is unique to itself.

Scripting options

We added 2 scripting tools as options to our build pipeline in Jenkins

  • Cake - build automation tool build based on C# scripting.
  • Psake - build autiomation tool based on Powershell.
...
// based on the file extension match the build method: .cake -> cake; .ps1 -> psake; .proj -> msbuild project
if(params.BUILD_FILE ==~ /(?i).+\.cake$/){
    // Cake (https://github.com/cake-build/resources)
    powershell label: 'invoke cake', script: "dotnet-build-resources/build.ps1 -Script '${params.BUILD_FILE}'"
}
else if(params.BUILD_FILE ==~ /(?i).+\.ps1$/){
    // PSake (https://github.com/psake/psake)
    powershell label: 'invoke psake', script: "Invoke-Psake -buildfile '${params.BUILD_FILE}'; exit [int]!\$psake.build_success"
}
...

Starting with Psake

Psake - Pronounced SAKE` (P is silent)

Domain Specific Language (DSL) built with PowerShell.
Pros: PowerShell is a .Net language so you have access to the whole .Net framework!
Pros: PowerShell is also Cross-Platform.

Install once on the build server and on the developer workstation via this powershell command

Install-Module Psake

It is important that the developer can run the build command the same way its being invoked on the build server.

Psake script file Structure

As I mentioned Psake is a DSL (Domain Specific Language) and so it has a unique structure. A simple example:

properties{
  $solution = dummy.sln
}

task default -depends 'Test'

task Test -depends 'Build' {
  dotnet test ...
  # run other building tool?
}

task Build -depends 'Clean' {
  dotnet publish $solution
}

task Clean {
  dotnet clean $solution
}

The structure is similar to msbuild project build file - properties at the top, tasks (instead of targets) afterwords.
In this example there are dependencies specified to most tasks, and the default task is test’. The dependencies are:

  1. test’ depends on build’ (which means: test’ will execute if build’ complete successfully).
  2. build’ depends on clean’.

The order of execution, therefore, will be: clean’ -> build’ -> test’

Examples of how to run the psake build script:

# Run default
Invoke-Psake build.ps1

# Run specific task
invoke-psake build.ps1 -tasklist clean

More complete example of psake build file for building dotnet core project: dummybuild.psake.ps1

PSake support for .NET Framework (not only dotnet core)

Install PowerShell module VSSetup. This module is an optional dependency of Psake that enables to call msbuild executable in PSake (by using the functions msbuild and Framework).

Install-Module VSSetup -Scope CurrentUser

Command to get all the installed versions of Visual Studio and Build Tools:

Get-VSSetupInstance
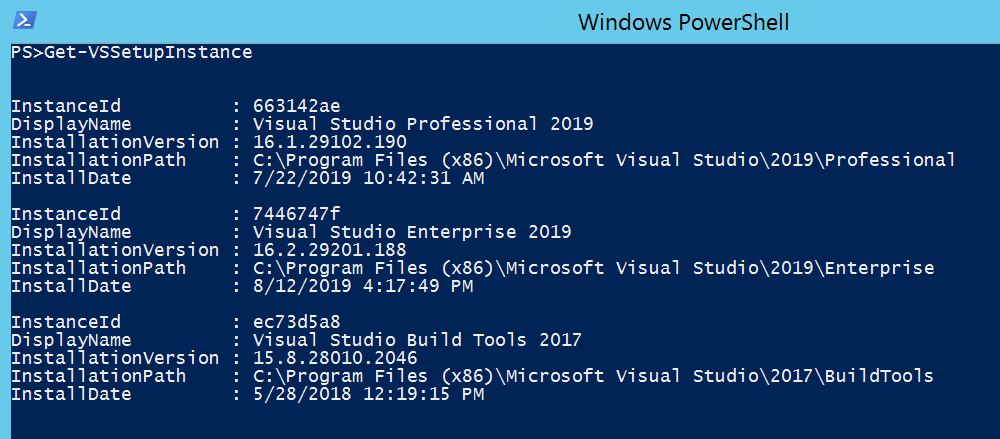
VS Setup Instances

Inside the Psake script select the required Framework, specifying it at the top will set the msbuild function to the matching msbuild version. Then call msbuild on a .sln or .csproj file.

Framework 4.6.1

Properties {
    $Workspace = $PSScriptRoot
    $PesterTests = Join-Path $Workspace 'calccli.pester.tests'
}

task default -depends test

task test -depends build {
    $TestResults = invoke-pester $PesterTests -OutputFormat NUnitXml -OutputFile 'TestResult.xml' -PassThru
    if($TestResults.FailedCount -gt 0){
        throw "$($TestResults.FailedCount) failed tests"
    }
}

task build -depends clean {
    msbuild .\calccli.sln /t:build
}

task clean {
    msbuild .\calccli.sln /t:clean
}

DEMO

Sample .Net Framework project, contains both psake build script file and msbuild project file (.NET Framework):

calccli

Build MSBuild Psake .NET
January 8, 2018

How to manage concurrent jobs in PowerShell

There had been many times in the past two months where I had to write scripts that run multiple jobs concurrently. Since PowerShell doesn’t have a built-in way to limit the number of jobs run at a time, this task falls on us, mere mortals. (On a side note: I’ve had my fair share of PowerShell Workflow and foreach -parallel, it is not ideal!).
Manage the concurrent jobs means, if there is more than X amount of jobs, wait for at least 1 job to finish its execution before starting another. Sounds simple enough. In the past, I wrote a snippet, which was a bulky chunk of code with over 100 lines of code and also did many other generic” stuff.
Since then I wrote scripts that implement that idea but I didn’t have a solid snippet to use or a simple pattern to follow.

Now I’ve written one that is simple and designed to do this one thing:

$ConcurrentJobsThreshold = 20

$Servers = @()

foreach($Server in $Servers)
{
    $RunningJobs = @(Get-Job | Where-Object{ $_.Status -eq 'Running' })

    if($RunningJobs.count -ge $ConcurrentJobsThreshold){
        $RunningJobs | Wait-Job -Any
    }

    Start-Job -Name "CopyTo $Server" -ScriptBlock {
        mkdir "\\$using:Server\C`$\Updates" -Force
        Copy-Item -Path "C:\KB123456.msu" -Destination "\\$using:Server\C`$\Updates\KB123456.msu"
    }
}

# Waiting for remaining jobs to finish (Change state to Completed, Failed, Stopped, Suspended or Disconnected)
Get-Job | Wait-Job

Lets go over it.

There are 3 inputs to this snippet:

  • $ConcurrentJobsThreshold integer variable — number of jobs that will run concurrently.
  • $Servers which represents a collection, we would like to start a job for each item in this collection.
  • The ScriptBlock value in the Start-Job cmdlet — What we do on each item.

There is a foreach loop, iterating through the collection.

First thing in the loop, we get all the jobs that are running. If the amount of running jobs is smaller than the threshold we set at the beginning, a new job will be created.
Otherwise, if the amount of running jobs is greater or equal (-ge) to the threshold we will wait for one of these jobs to finish.

Wait-Job gets an array of job objects and waits for them to change status to Completed, Failed, Stopped, Suspended or Disconnected. (See the Notes section in the help page of Wait-Job).
By itself, Wait-Job will wait for all the given jobs to finish (change its state to one of the specified states), and with the -Any switch it will wait for the first job that will finish (or if it’s already finished), and return it.

Finally, we are waiting for all the remaining jobs to finish (Wait-job without -Any), and we’re done.

Now, this is just a template, you can add more stuff like:

  • Progress bar using Write-Progress.
  • Stop the Script execution if there are more than Y amount jobs with state of Failed’.
  • Collect the jobs outputs to a log file: After the concurrency threshold was reached
    $RunningJobs | Wait-Job -Any | Receive-Job -Wait -AutoRemoveJob | Out-File 'log.txt' -Append
    and at the end:
    Get-Job | Wait-Job | Receive-Job | Out-File 'log.txt' -Append
  • Add a Pause functionality.

In one of the recent scripts, where the line $RunningJobs | Wait-Job -Any I wrote Get-Job | Wait-Job -Any instead. In this variation of the script after the first job failed there was no limitation on the number of jobs that were running concurrently. Instead of 20 jobs, we had more than 200, that took too many resources (the horrors!!!). What happened was something like that: After a job finished its execution (changed state to Failed or Completed) Get-Job hands over Wait-Job -Any an array of jobs that looks like this (for illustration only the jobs statuses are listed):

@(Failed, Running, Completed, Running, Running,…) | Wait-Job -Any

Wait-Job -Any immediately returns the first finished job, which in this example could be either the first job (with status Failed’) or the third job (with status Completed’). And while the amount of running jobs is still the same, a new job is created which exceeds the threshold that was set. I could make sure to remove finished jobs with Remove-Job or Receive-Job -Wait -AutoRemoveJob, which is actually what I did for jobs in Completed’ state only and forgot the failed ones… >_>

For reference please don’t hesitate to use Get-Help, and Get-Help -Online
Start-Job
Wait-Job
Receive-Job
Stop-Job
Remove-Job
or to ask me 🙂

Have a great week!

Amir.

Concurrency PSJob Snippet
June 26, 2017

My script to inspect PowerShell objects

About two years ago a friend from work asked me to help him with finding an object’s properties path that holds a specific value he knew existed there somewhere.

To clarify what I’m calling a properties path is this:

$obj.FirstLevelProperty.SecondLevelProperty.ThirdLevelProperty…

etc.

The first idea that came to my mind was to use Show-Object cmdlet by Lee Holmes. In short Show-Object opens a window with the object’s properties tree that you can inspect (you can read more on how to use this cmdlet on The Scripting Guy’s blog post).
My friend didn’t like the idea that of inspecting the object property by property, branch by branch. He wanted a fast way, a function if possible, to search for a value and get the properties path so he could copy-paste into his scripts.

I accepted his request as a challenge and started writing.
My initial idea was to inspect the object using Get-Member to get the names of all the object’s properties, print their names and dynamically call them, like this:

$InputObject = Get-Process winlogon
Get-Member -InputObject $InputObject |
    Where-Object {$_.MemberType -eq 'Property'} |
    Select-Object -ExpandProperty Name | Foreach-Object {
    "[ORIGIN].$_ : $($InputObject.$_)"
}

But this is only to get the first level properties, if I want to get deeper it will be easy to write a recursion:

function Get-ObjectProperty {
    param($InputObject, $Path="[ORIGIN]")

    Get-Member -InputObject $InputObject |
        Where-Object {$_.MemberType -eq 'Property'} |
        Select-Object -ExpandProperty Name | Foreach-Object {
            "[ORIGIN].$_ : $($InputObject.$_)"
            Get-ObjectProperty -InputObject $InputObject.$_ -Path "$Path.$_"
    }
}

As you can see above, each line of the output start with [ORIGIN], which is a representation of the $InputObject parameter, joined by dot (‘.’) with the properties path, a colon and the corresponding value.
With that its easy to look for a specific value using Select-String:

PS C:\> Get-ObjectProperty (Get-NetAdapter)[0] | Select-String ': .*MSFT'
[ORIGIN].CreationClassName: MSFT_NetAdapter
[ORIGIN].CimClass: ROOT/StandardCimv2:MSFT_NetAdapter
[ORIGIN].CimClass.CimClassName: MSFT_NetAdapter
[ORIGIN].CimClass.CimSystemProperties.ClassName: MSFT_NetAdapter
[ORIGIN].CimSystemProperties.ClassName: MSFT_NetAdapter

But there might be a problem with the function as written above. There are objects that have one of their properties points to another object, and its properties points to other objects and so on…
And somewhere along the way there will be a pointer back to the first object. In that case calling the function will cause it to run in an infinite loop.

To solve that I added 2 more parameters, $Depth and $Table:

  • $Depth sets a limit to the amount of recursion calls in a branch.
  • $Table is an array that holds all the objects hash codes that were processed along the way. If an object has the same hash as another object that was processed before, it will be skipped.

Note that this is not the perfect solution as different objects can have the same hash code. As explained on MSDN, it depends on the implementation of the GetHashCode() function.

Yesterday I’ve uploaded the script function Get-ObjectProperty to my Github repository, but not before I made some improvements:

  • Replaced the implementation of ($obj | Get-Member) with ($obj.psobject.Properties). It produces the same results but I feel that it’s more fluent to write. Each property in psobject.Properties has value property, so instead of extracting all the property names and calling $obj.$propertyName I’m just calling $obj.psobject.Properties.foreach({$_.Value}).
  • Added the ability to filter the leaf properties by regular expression.

Until next time,
have a great week,
sincerely,
Amir.

psobject inspect reflection
March 11, 2017

First Post

So this is my first blog post!

Finally!

I was struggling with writing this post for a while now. I opened this blog over 6 months ago…

My name is Amir Granot, Granola is a nickname I was given by my friends for the first time at school and it stuck.

This blog will be a place where I will share my ideas, thoughts about technology, and tools that I find useful to me (wether I wrote them or someone else).

Almost every day I write something new, a script, code snippet, and every now and then I build something that might be useful to others.

Nowadays my focus is everything PowerShell but it may change as I grow, learn and master new things.

I was inspired to open this blog by bloggers and contributors in the PowerShell community, to name a few:

Martin Schvartzman — https://social.technet.microsoft.com/Profile/Martin%2bSchvartzman
Don Jones — https://donjones.com/
Adam Bertram — http://www.adamtheautomator.com/
Ed Wilson — https://blogs.technet.microsoft.com/heyscriptingguy/
Mosh Hamedani — http://programmingwithmosh.com/

Sincerely,

Amir.

blog first firsts